Installing sound deadener in your vehicle? It's the ideal time to update your carpet.
Car Builders can supply Australian manufactured, quality, heat-moulded carpets.
- Press moulded to the exact shape of floor pans.
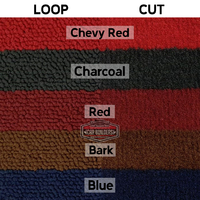
- Available in loop (generally used pre-mid 1980s) or cut pile (often used in post mid 1980s vehicles).
- Driver's side, heel mat.
- Available in 14 different colours.
Due to vehicle variations from manual to auto etc, these carpets do come oversized and do require basic trimming e.g. shifter cut outs, foot rests, seat mounts and sill trims.
Please note: These carpets are made to order, please allow for up to five business days for them to be dispatched.
Colours displayed on the listing should be used as a reference only. They will display slightly differently depending on the screen you are using.
Moulded Carpet Fitting Instructions
How to install:
-
Remove door sill plates, kick panels, front and rear seat bases, consoles, seat belt bolts and any other items fixed to the existing carpet.
-
Remove old carpet and retain for step 5.
-
Remove old underfelt making a note of its position in the vehicle.
-
Clean the area in preparation for fitting the new carpet.
-
Place the old carpet over the new carpet to form a template and mark holes and cut outs with chalk (do not cut at this point).
-
Install new underlay or replace original underlay in the same position the underlay was removed from the vehicle.
-
Starting from the rear, place your new moulded carpet in the vehicle, centering it on the tunnel and working towards the sides.
-
Repeat step 7 for the front carpet.
-
Push the front carpet forwards to tighten the carpet over the tunnel/hump, the top of the carpet may need to be trimmed to fit. Ensure you match the contours of the carpet with the floor to confirm the correct fit. You may need to cut the holes marked in step 5. Start with a small hole, then enlarge gradually if required.
-
Depending on your vehicle model, trim sides of carpet (excess is given to allow for adjustment in the fitting process).
-
Replace all trims and fixtures removed in step 1.
*Please note – These instructions are generic, to be used as a guide only.
For further questions or concerns, please contact us on 03 8777 0960.
(MOULDED_CRP_MITSUBISHI)
| MANUFACTURER | MODEL | SERIES | DATES |
| MITSUBISHI | COLT | RA,RB,RC,RD | 1980 - 1989 |
| MITSUBISHI | COLT GALANT | GB GC GD | 1969 - 1977 |
| MITSUBISHI | L300, L300 EXPRESS, COLT SOLAR | 2WD FRONT ONLY | 1979 - 1986 |
| MITSUBISHI | LANCER | LA,LB,LC | 1976 - 1981 |
| MITSUBISHI | MAGNA | TM,TN,TP | 1985 - 1990 |
| MITSUBISHI | SCORPION | GE,GK,GL AUTO | 1979 - 1985 |
| MITSUBISHI | SCORPION | GE,GK,GL MANUAL | 1979 - 1985 |
| MITSUBISHI | SIGMA | GE,GH AUTO | 1978 - 1981 |
| MITSUBISHI | SIGMA | GE,GH MANUAL | 1978 - 1981 |
| MITSUBISHI | SIGMA | GJ,GK,GN,VP | 1982 - 1987 |
Customer Reviews
Be The First To Review This Product!
Help other Car Builders users shop smarter by writing reviews for products you have purchased.


