Instagram @attiethevan
Website https://www.attiethevan.com/
“Enjoy the silence”
How do you know if something will be good or not if you’ve never tried it?

The sound deadening install.
We ummmmmed and ahhhhhhhed a lot about sound deadening. Three months ago we’d never even heard of it!
In the end, we chose to install sound deadening in our van.
And we are glad we took a chance on it. It seems to make a difference in our van, albeit a moderate difference.
Because Vans are noisy
The metal panels in a van vibrate and make an echoing or ‘tinny’ noise, which can feel like a real rattle inside your head.
Sound also travels through the floor in, from the road, the tyres, the change of surfaces, and from the dirt and rocks that get flicked up (which can actually be really scary when it makes a big BANG as you’re driving along the freeway).
Moreover, the van itself can be noisy, especially if you have parts that are wearing out or you have a noisy diesel engine.
And, of course, the external environmental around the van is noisy, with traffic, rain, voices, and so much more.
Sound deadening offers a way to quieten all that noise.
What is Sound Deadening?
Sound deadening is a material that absorbs the vibrations and energy that create sound waves, thereby giving a sound dampening effect.
There are different types of sound deadening, including butyl rubber sheets, vinyl or foam underlay mats, tape, paint, spray, and more.
There seems to be a wider variety of suppliers in the States. We did look at sourcing Kilmat or Dynamat from the U.S., but the cost of shipping almost equalled the cost of the product. Not for us.
We ended up finding a local Aussie supplier, Car Builders.
And we had a really positive experience with them. They are really lovely people and the product is good and easy to use.
To be as economical as possible, we just went for the sound deadening sheets. But there is a whole series of steps you can take to ‘optimally’ sound deaden a van.
These sound deadening sheets are composed of an anti-drum, butyl rubber noise absorption layer topped with an aluminium layer. Apparently, these sheets have both acoustic and thermal benefits.
We had a bit of a laugh trying to work it all out — Butyl rubber is a funny material to work with.
Butyl rubber is inherently sticky, so it can be applied it straight to the walls of the van (so long as they are clean). It doesn’t need glue or nails, and its resistant to most things. Just watch out it doesn’t stick to any clothing in the process!
And apparently, all you need is 25% coverage to get a noticeable sound dampening effect.
But it’s recommended to have 60% or more.
Does sound deadening make a difference?
Yes. We think so.
For our testing, all we have is a video of Peter knocking on one side of the van that has sound deadening, and the other which doesn’t.
Unfortunately, we didn’t do a more objective test to measure exactly how much difference it makes.
But there is a very noticeable difference, especially with the harsh tinniness of the metal wall panels.
We found conversations were easier and we didn’t have to play music so loudly to drown out the external noise of the van as we drove.
But, were we just trying to convince ourselves there was a difference, or was there a real change?
We started researching. Lots of people have tested their sound deadening. Whilst the results were inconsistent, there seemed to be some consensus:
Sound deadening apparently gives a ~5-10 dB reduction in noise.
But it got us wondering, what exactly does that mean?
Let’s nerd out on sound for a bit
The decibel scale has been the standardised method used to measure sound (and a few other things) since the 1920s. The ‘bel’ was named in honour of the infamous Alexander Graham Bell. The scale was originally devised to measure signal loss (or transmission efficiency) in telegram and telephone communications.
The decibel (dB) scale is logarithmic.
The equation for a decibel is:
dB = 10*log10(P2/P1), where P is a power
This calculate says:
-
A 10 dB sound level increase means the sound wave is 10x more powerful
-
A 20 dB increase means the sound wave is 100x more powerful.
-
and so on…
To put the decibel into perspective, here’s a table of the decibel level of everyday sounds, and how this corresponds with what the human ear can hear:
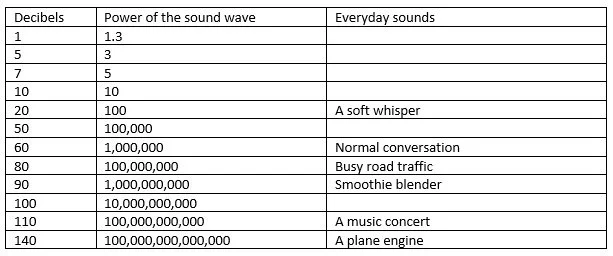
But DECIBELS AREN’T the same as loudness.
If something is twice as loud, it doesn’t necessarily correlate with double the decibels. That’s where the log scale comes in.
Scientists haved correlated decibels with perceived loudness simply by asking people how loud they think a noise is at a given decibel level.
And the results?
Apparently for every 10 dB increase in the sound level, the perceived loudness doubles. And the inverse is true too.
So, what does this mean for the 10 dB change the sound deadening makes?
Well, a 10db reduction in sound level corresponds with the loudness halving. Meaning…
In a van, sound deadening can potentially Cut the noise loudness in half.
Not bad. Not bad at all.
(Please note: this is just a rudimentary calculation based off limited information. It’s not a perfect experiment - the idea was just to get a rough idea of the real world impact the sound deadening makes!)
So, we were pretty confident the sound deadening made a difference.
Here’s how we installed it…
Installing sound deadening in our van
In our van plan, we only budgeted $50 AUD for the sound deadening (this was before we even knew what sound deadening was).
Spoiler, that was dead wrong.
We were quick to realise sound deadening is expensive. But, we decided the benefits outweighed the cons, and it would be beneficial for our situation. So, as it goes, we flexed the budget.
As a result, we had to be economical with our purchase. This meant we probably got less than we needed. But we are still stoked with the results.
This was our (somewhat unconventional) method:
Step 1
Firstly, we measured the square meterage of our van.

Attie the Van
Step 2
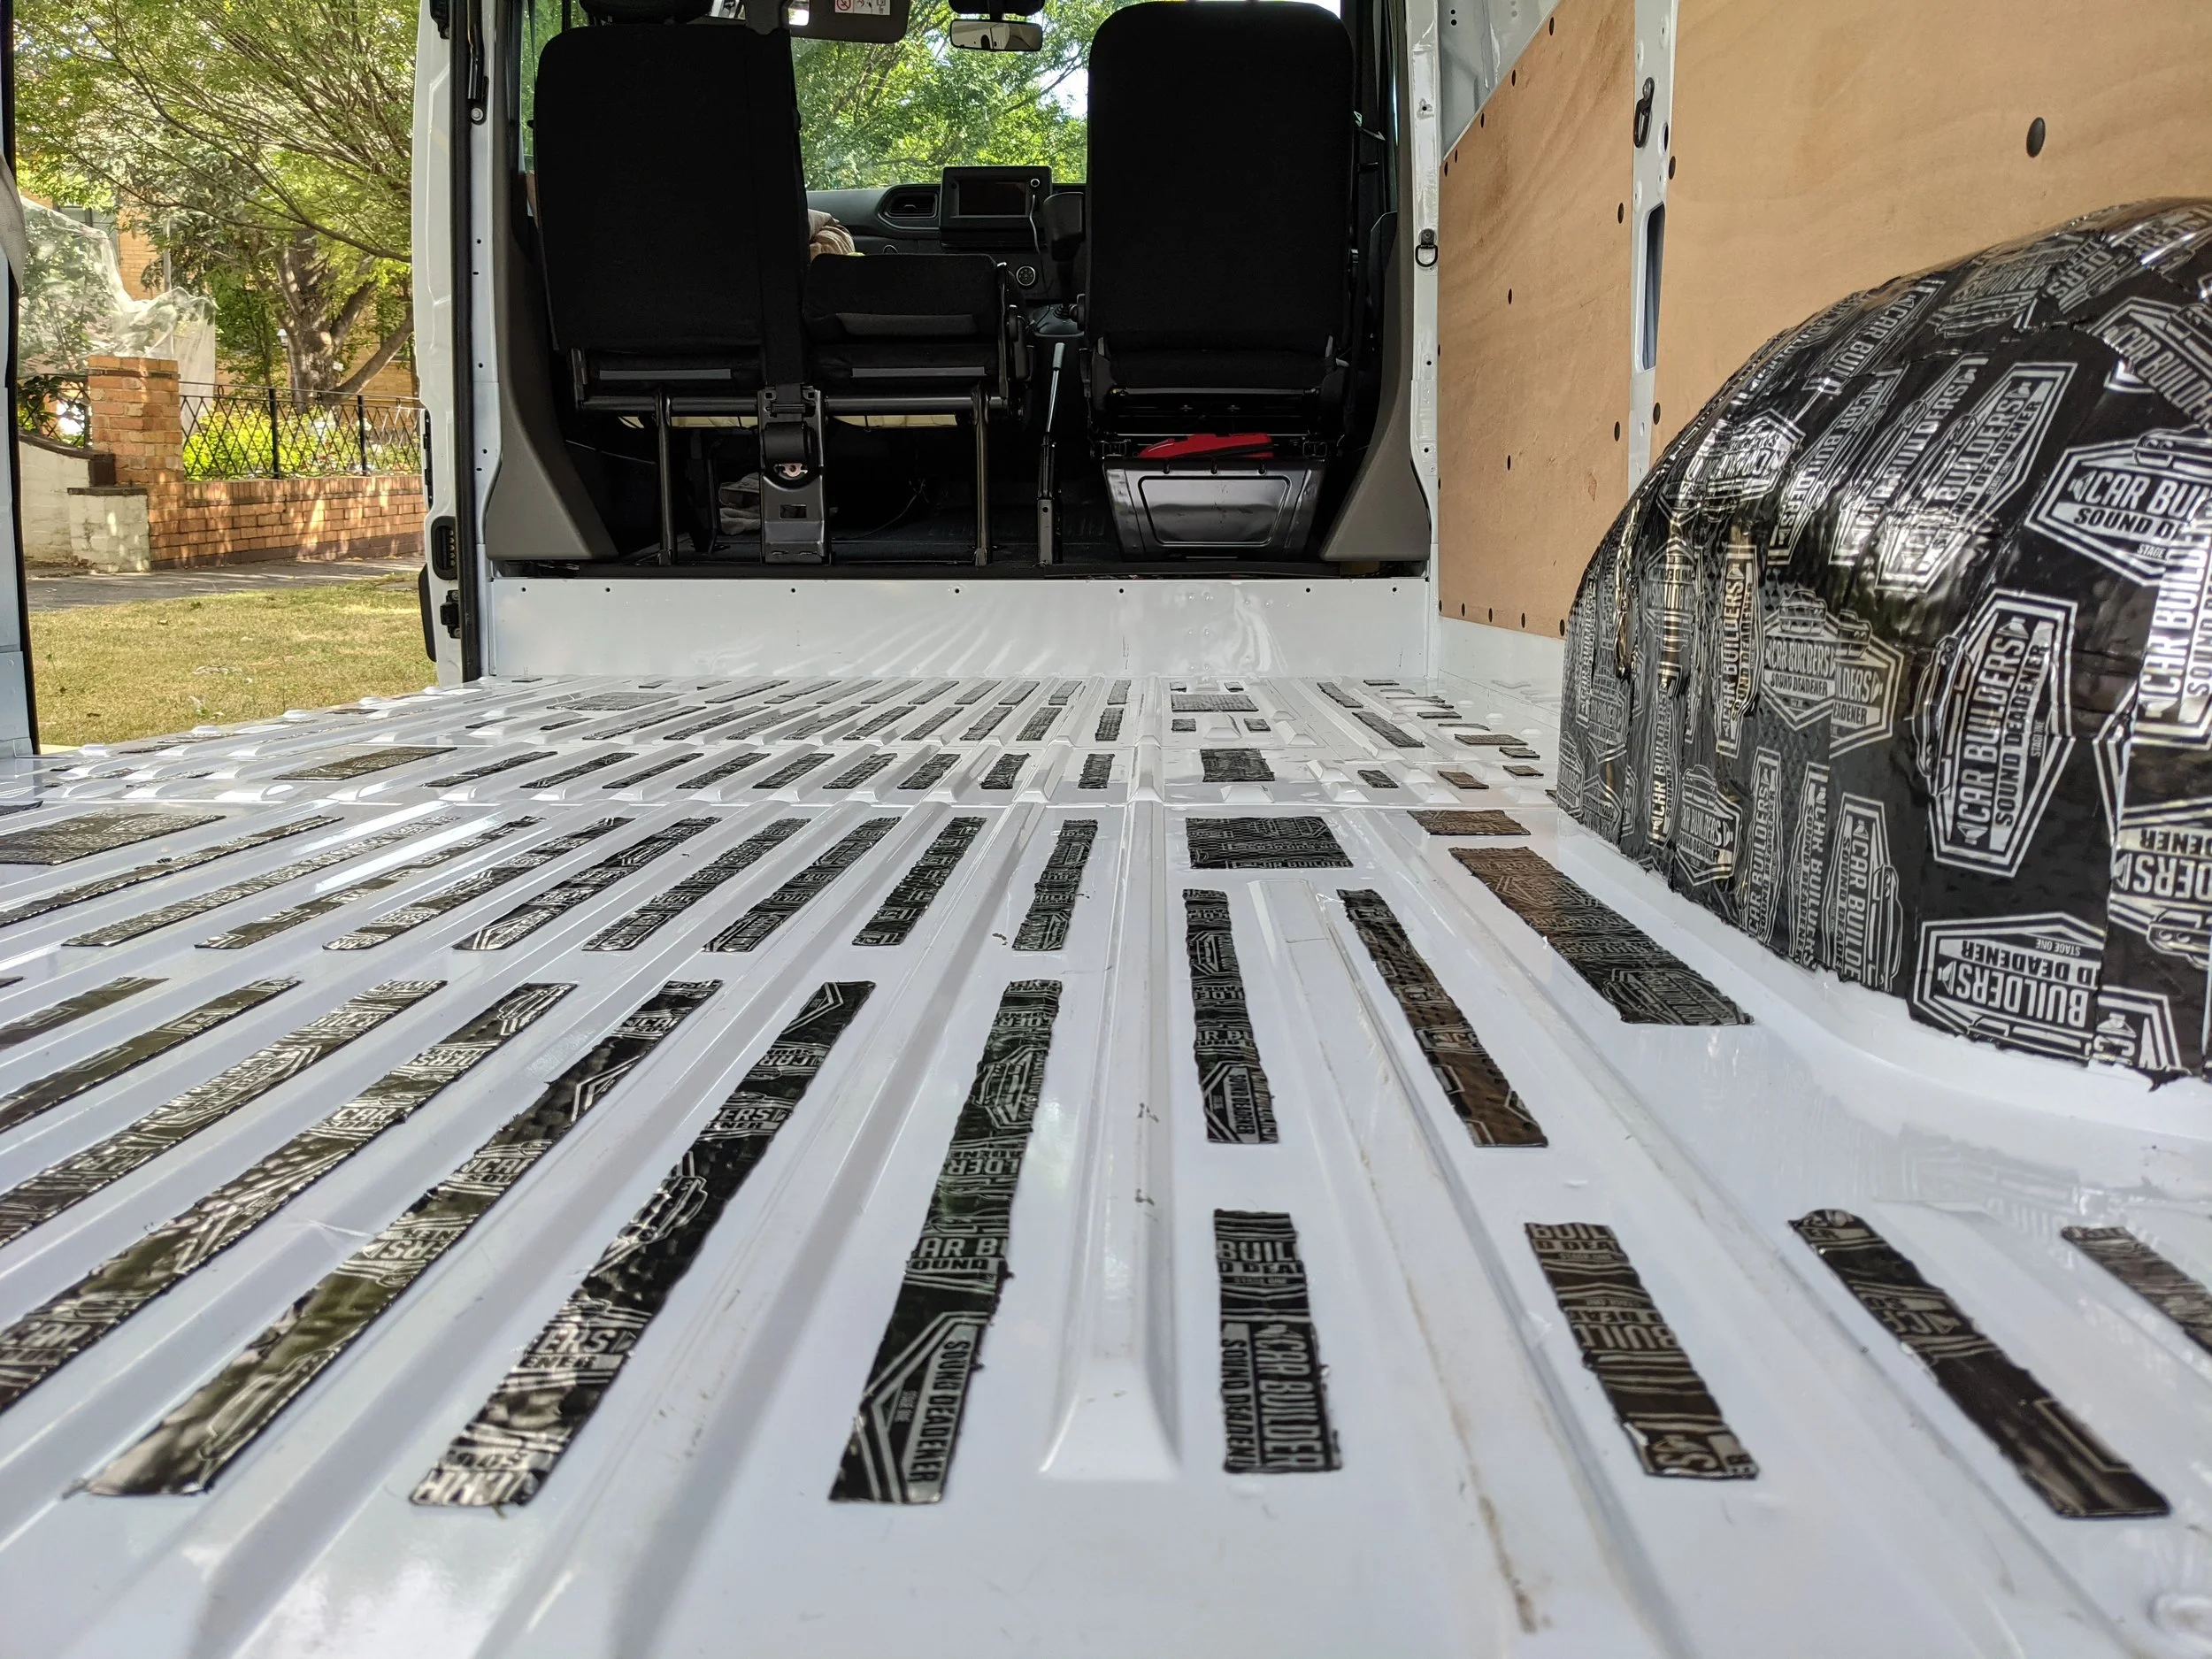
We then ordered the minimum amount of sound deadening possible. From Car Builders, we ended up getting two x boxes of 12 sheets (each sheet is 50cm long x 30cm wide x 2mm deep). I drove out to pick it up and the team helped me load it into the van.

Car Builders in Kilsyth, Victoria
Step 3
We rationed our sheets carefully, to make the most of what we had, aiming for at least 25% coverage. The sheets are just peel-and-stick, so its a relatively straightforward process (in theory).
Step 4
As you can see, we made sure our site manager was on location throughout the process. A very important step!

Little Zeze (our foster dog) overseeing the process, as always.
Step 5
We started with the walls (it seemed to be the easiest place to start when you’ve never done it before). We cut each sheet to size (you can cut the sheets with plain old scissors).
The butyl rubber took a bit of getting used to. And, a bit of time figuring out the right dimensions and where each piece would fit, all the while making sure we were sticking to our rations.

Not as easy as it looks
Step 6
We then applied the sound deadening to the roof.
We avoided putting sound deadening where we didn’t need it (like where we are going to cut out part of the roof for a fan and a window) and also in places that we were leaving with the factory finish (like parts of the doors).
Step 7
Then we added sound deadening to the wheel arches. This was fun.
Step 8
Then to the floor.
Cutting the strips for the floor was easily the most time-consuming part of the process. We should have worn gloves because the aluminium edges can be sharp!
It was definitely not perfect, but we are pretty happy with the results!

Definitely wasn’t perfect
Step 9
After each piece was applied, we “rolled” it (with some improvised tools — see if you can spot one) in order to secure each piece and improve the adhesion.
At the end of the process, we were covered in the butyl rubber. Next time, we’ll be choosing our work outfits better.

Spot the unconventional tool we used
Step 10
Lastly, we sat back and enjoyed our work!

Car Builders actually have videos and guides on how to professionally install sound deadening in a vehicle. If there is a method to follow, it should probably be that one!
Update:
Whilst we were still building the van, but we wanted to go on a quick adventure, we had to come up with a way to stop the butyl rubber getting on our stuff.
So we got some Ametalin Insulation Tape to cover the wheel wells and block any butyl rubber escaping. Worked like a dream!

How long does it take to install sound deadening?
PB and I have realised that everything always takes longer than you think. Much longer.
So, we’ve made a rule for when we need to estimate the time something will take.
The rule of building anything:
1. Estimate (generously) how long it will take.
2. Double that number, and add a further 50%.
It seems excessive, but we are constantly proven right.
For our van, we thought it would take 2 hours to do the sound deadening.
In reality, it took 5+ hours.
I’m sure once you get used to the material, you could do it much, much faster. But not for us on this occasion!
That’s why we have the rule now.
Why we installed sound deadening in our van
There were a few reasons we decidedto install sound deadening:
-
We wanted to reduce the everday noise pollution when driving – better for conversations and listening to podcasts or music!
-
We were hoping it would help us sleep better, with less external environmental noise at night.
-
People have said they regretted not installing it. And it’s too late if you want to add it after the build is finished!
Why some people decide not to install sound deadening
There are also some reasons people choose not to install sound deadening:
-
People argue the van always be noisy when you drive anyways, especially if there is cutlery rattling and squeaky doors. This may cancel out the beneficial effect of the sound deadening.
-
Sound deadening can add extra weight, especially if you do it properly and use the correct coverage. Each 12 sheet box weighs around 6kg.
-
It’s expensive. It costs $104.99 for 1.8sq/m. And the research isn’t conclusive about exactly how effective it is. Who really knows how much benefit it gives for every dollar invested!
And the total cost?

Costs add up pretty quickly with sound deadening. Of course, you could go all out and install it everywhere, but that would be very very expensive.
There are a lot of different opinions, and a lot of different options for noise reduction in a conversion.